These Soft Cinnamon Rolls are incredibly tender and light. They are perfectly sweet and slathered in a whipped, buttery, cream cheese icing.


What makes these cinnamon rolls so very soft and fluffy is the tangzhong.
Tangzhong is a cooked slurry of flour and water often used in soft, fluffy Asian breads like Japanese Milk Bread. It contributes to the soft, airy texture of these cinnamon rolls and also helps keep them soft for days.
For some helpful tips before you begin, click here. (Recommended)
Makes 12 cinnamon rolls
INGREDIENTS:
Tangzhong
- 120 ml (1/2 cup) water
- 28 g (3 1/2 tablespoons) all-purpose flour
Dough
- 240 ml (1 cup) half & half
- 12 g (1 tablespoon) plus 100 g (1/2 cup) granulated sugar, divided
- 7 g (2 1/4 teaspoons or 1 packet) active dry yeast
- 532 g (4 1/4 cups) all-purpose flour
- 35 g (1/4 cup) full-fat milk powder
- 12 g (2 teaspoons) fine salt
- 2 large eggs
- 56 g (1/4 cup) unsalted butter, softened
Filling:
- 113 g (1/2 cup or 1 stick) butter, softened
- 220 g (1 cup) brown sugar
- 18 g (1 1/2 tablespoons) cinnamon
- 23 ml (1 1/2 tablespoons) vanilla
Cream Cheese Icing:
- 227 g (1 cup or 1 8-oz. package) cream cheese, room temperature
- 113 g (1/2 cup or 1 stick) unsalted butter, softened
- 220 g (2 cups) powdered sugar
- 13 ml (2 1/2 teaspoons) vanilla extract
- 1.5 g (1/4 teaspoon) fine sea salt
- 60 ml (1/4 cup) heavy cream, room temperature
DIRECTIONS:
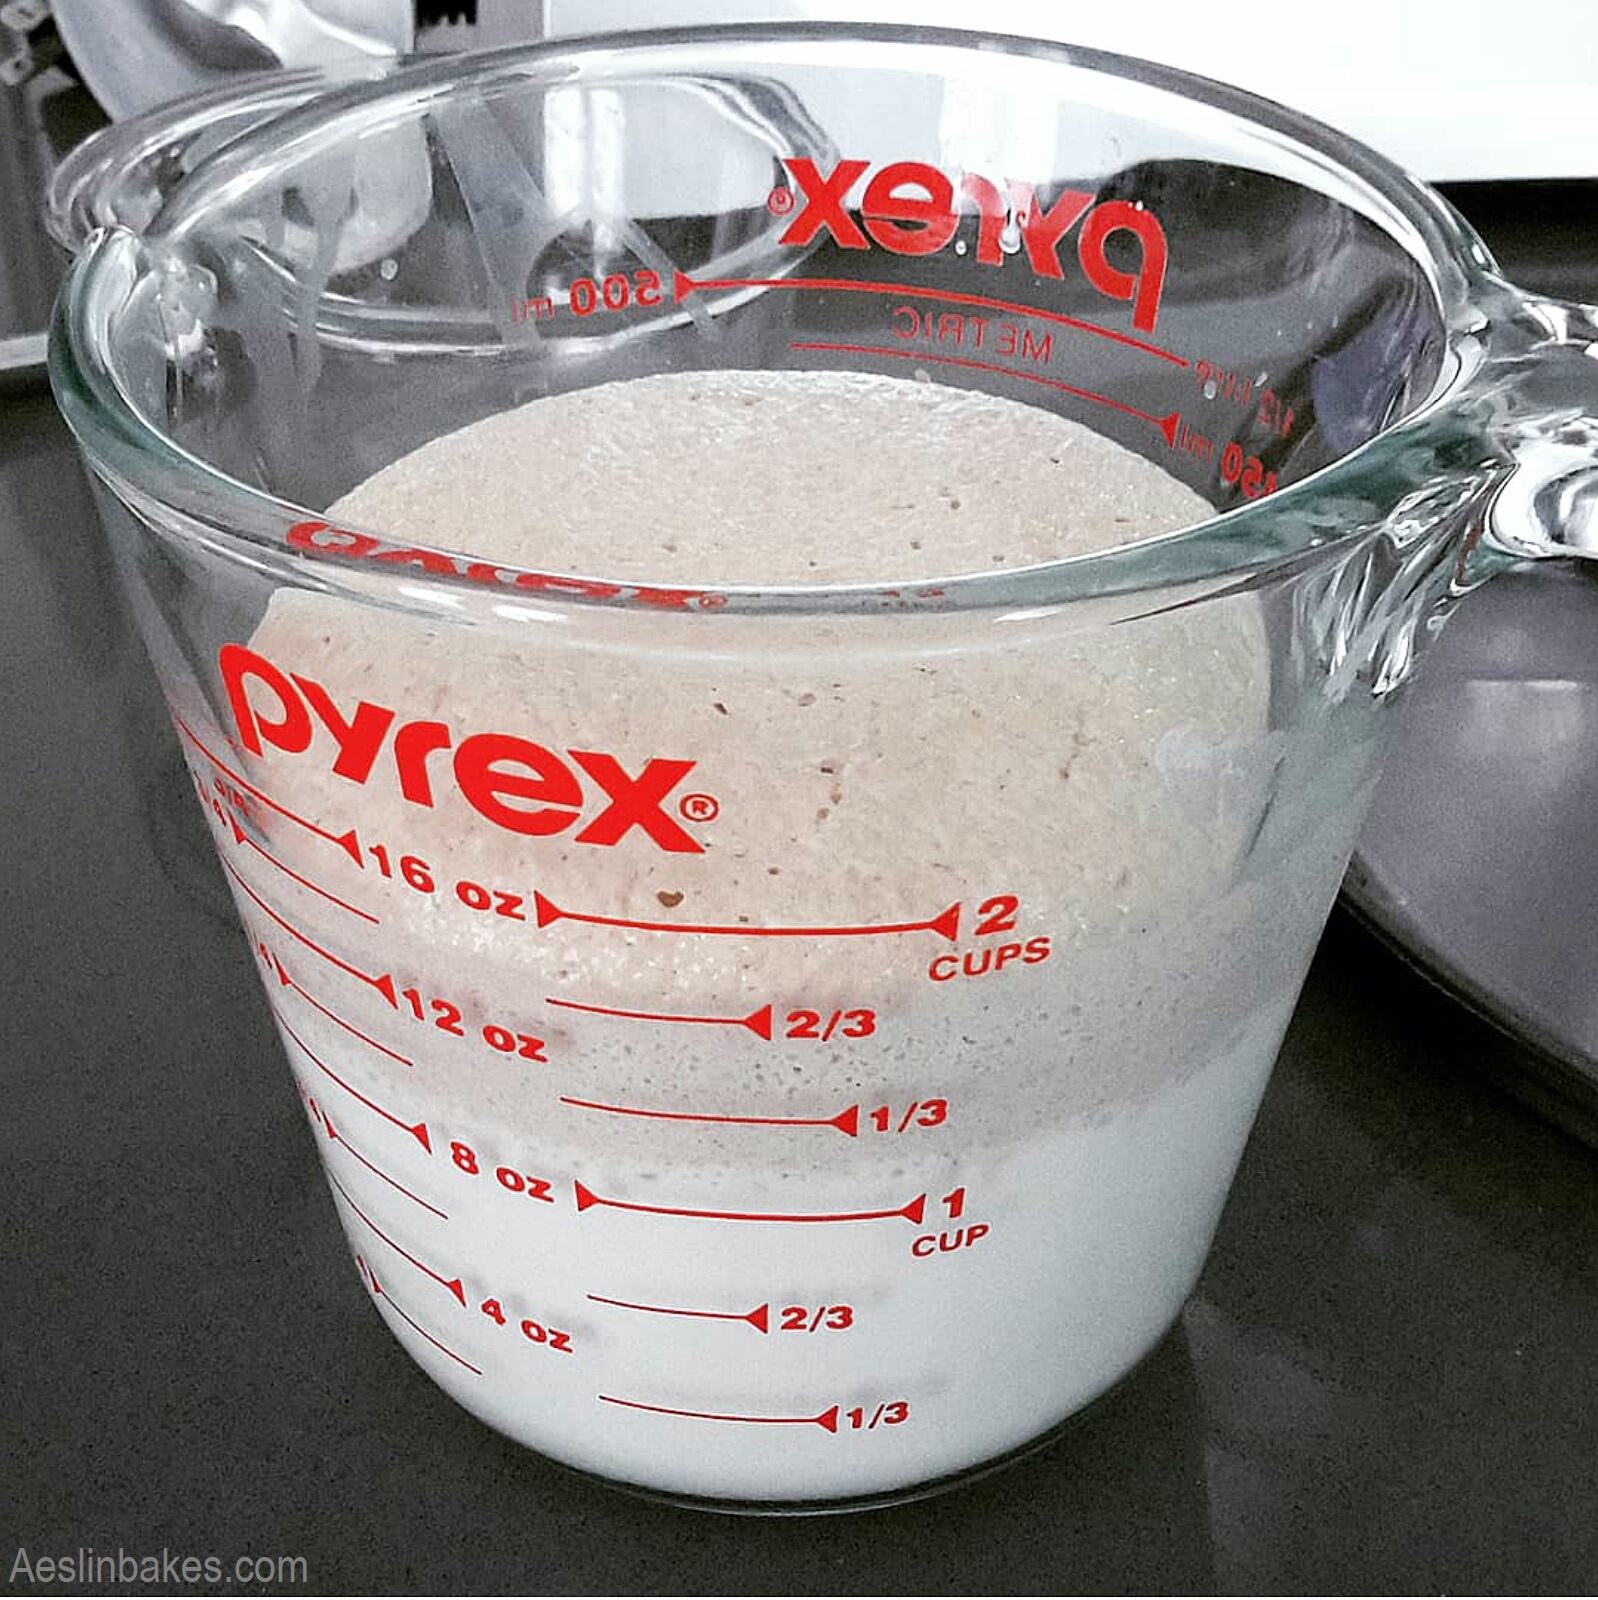
1. Make the tangzhong.
– In a small pan, over medium heat, combine the water and flour for the tangzhong.
– Whisk until thick like pudding, maybe 3 or 4 minutes.
– Pour into a small bowl and refrigerate to cool while gathering the remaining ingredients.
2. Activate the yeast.
– Warm the half & half to about 110°F (49°C). (Slightly warm to the touch)
– Whisk together the warm half & half, 12 g (1 tablespoon) of the sugar and the yeast.
– Let sit for about 5 to 10 minutes, until foamy.
3. Combine the ingredients.
– In the bowl of a standing mixer, briefly whisk together the flour, milk powder, salt and the remaining sugar.
– Add in the cooled tangzhong, the foamy yeast mixture and the eggs
– Mix with a wooden spoon until all the flour is absorbed and a shaggy dough is formed.
4. Knead the dough until smooth and elastic.
– With the paddle attachment, knead the dough on medium-high speed (setting #4) for 7 to 10 minutes, until the dough is smooth and stretchy. It will still be sticky, but should be elastic enough to stretch into a smooth translucent ribbon without tearing. (See TIPS)
5. Gradually add the butter; knead until smooth and elastic.
– Switch to the dough hook attachment. Then on low speed, begin adding the butter two tablespoons at a time, waiting for each addition to be incorporated before adding the next.
– Stop and scrape down the hook and the sides of the mixer bowl as needed.
– After all the butter is incorporated, increase speed back to medium-high (setting #4) and knead for another 5 minutes or until the dough is smooth, glossy and elastic.
6. Let the dough rise for 1 hour (until double in size) or refrigerate overnight.
– Scrape the dough into a large, lightly greased bowl.
– With lightly greased fingers, pull up the sides of the dough and fold into the center. Do this a few times to gather the dough into a ball.
– Flip the dough ball so now the top is smooth and greased.
– Cover the dough with plastic wrap and let rise for about 1 hour (or longer if your kitchen is cold) or until double in size.
OR
– Cover the dough with plastic wrap and let the dough rise and rest in the refrigerator overnight or for up to 2 days. (But any longer than that and the dough may begin to smell “yeasty”.)
- You may need to punch the dough down at least once as the dough continues to rise in the refrigerator. After punching down, reshape the dough into a ball, cover and place back into the refrigerator.
7. Make the filling.
– Beat the softened butter, brown sugar, cinnamon and vanilla in a medium bowl until soft and fluffy. (The softer and fluffier the filling, the easier it will be to spread.)
8. Prepare the baking pan; Roll out the dough into an 18×18-inch square,
– Grease a 10 x 15-inch baking pan. Line the bottom with parchment paper as well, if you wish.
– Turn the dough out onto a lightly floured counter.
– Use a floured rolling pin to roll the dough into an 18 x 18-inch square. (Dust the counter and rolling pin with flour, as needed, if things get sticky. Also, turn the dough occasionally to ensure that the dough is not sticking to the counter.)
9. Spread the filling on the dough and roll into a log.
– Spread the filling over the rolled-out square leaving about a 1/2-inch of bare dough along the bottom edge, closest to you. (See TIPS)
– Starting from the top, roll the dough toward you into a log. Pinch the seams.
– Nudge the dough to make the log even in thickness from end to end.
10. Slice the dough and place in the prepared pan.
– Using dental floss (not mint), strong thread, or a very sharp, lightly oiled, unserrated knife, slice the log into 12 equal pieces (about 1 1/2 inches each).
– Place the rolls cut-side up in the prepared pan, evenly spaced, leaving room to expand.
notes: To slice using dental floss, slide a long piece of dental floss under the dough. Criss-cross it around the top. Pull in opposite directions to pull the floss through the roll. Repeat, slicing at about 1 1/2″ intervals.
12. Let the cinnamon rolls rise until puffy.
– Cover the cinnamon rolls with plastic wrap and place somewhere draft-free.
– Let the cinnamon rolls rise about 1 hour (or longer) or until they feel soft, puffed and are just about double in size.
OR
– Cover the cinnamon rolls with plastic wrap and place in the refrigerator overnight.
– The next day, take the cinnamon rolls out and let rise at room temperature for 2 or 3 hours until they feel soft, puffed and are just about double in size.
13. Preheat the oven BEFORE the rolls are done rising.
– Before the cinnamon rolls are done rising, begin preheating the oven to 350°F (176°C). (For glass or dark pans, preheat the oven to 325°F (163°C.) Expect the oven to take 20 to 30 minutes to preheat.
– Move the oven rack to the lower-middle position.
14. Bake the cinnamon rolls for 30 minutes.
– Bake the cinnamon rolls for 30 minutes, or until they look puffed and golden-brown on top, and have an internal temperature of 190°F (88°C).
– Place on a rack to cool.
notes: If the top is browning too fast, tent with foil.
15. Ice the cinnamon rolls while still warm.
– While the cinnamon rolls are cooling, beat together the cream cheese, butter, powdered sugar, vanilla and salt until creamy and smooth.
– Whip in the heavy cream until the icing is light and fluffy.
– Slather at least half of the icing all over the still-warm cinnamon rolls. (Be sure to ice the outer edges and sides of cinnamon rolls, too.)
– Spread some or all of the remaining icing on top of the cinnamon rolls, to your liking.
Notes:
– The icing can be made ahead of time, covered and refrigerated. Re-whip before using.
TO STORE CINNAMON ROLLS:
– Store the cooled cinnamon rolls in a sealed container or covered with plastic wrap.
– Press some plastic wrap on any cut or exposed edges to prevent them from drying out or forming a “crust”.
– If your kitchen is cool (70°F/21°C or cooler), according to Cooking Light (see link below), baked goods with cream cheese frosting can be left out overnight. Otherwise, refrigerate.
TO REHEAT CINNAMON ROLLS:
– Microwave individual rolls for about 20 seconds each (30 seconds if refrigerated).
– Or reheat the rolls covered with foil at 350°F (176°C) for 5 to 10 minutes.

*****

About this recipe
Soft Cinnamon Rolls are a weekend treat and a bit of a labor of love. But they are so tender, light and delicious. Truly something special and absolutely worth the time.
You can always spread the work over two or three days, if you like. The extra time will actually develop the flavor of your cinnamon rolls and make the super soft dough easier to shape and roll. However, be careful. Extending the time beyond three days has the risk of your dough starting to smell and taste “yeasty”.
The use of tangzhong (a cooked slurry of flour and water) in this recipe makes this a soft and sticky dough, which then results in cinnamon rolls that are incredibly soft and light.
Tangzhong will also extend the shelf life of your cinnamon rolls, keeping them soft and moist for days.

It’s a special “secret” ingredient that I try to incorporate in as many of my bread recipes as I can, such as my Soft & Fluffy Wool Roll Bread, Siopao Bola Bola (steamed meat-filled buns), and Soft & Fluffy Brioche.


TIPS:
Here are 11 helpful tips:
1) Invest in a scale and an instant-read thermometer!
– While I sometimes find using volume measures more convenient, weight measures will give more accurate and consistent results. So if you bake regularly, you really should get a scale. (Preferably one that reads ounces and grams.)
An instant-read thermometer removes any guessing when determining whether your baked goods are fully baked, especially with cinnamon rolls (and other sweet doughs) that can often brown on top while the middles are still under-baked.

2) Some tips when starting your dough:
Make sure to cool the tangzhong.
– Prepare your tangzhong first and then give it time to cool. If your tangzhong is still too hot when used, it may kill the yeast.

Make sure the butter is softened.
– Butter will incorporate into the dough best when softened. Allow cold butter to sit out for at least 30 minutes to soften, or until you can press it with your finger and it will give beneath light pressure.
– To speed up softening butter, I usually cut my cold butter into thin pats or small cubes. Then after a few minutes, I mash the butter with the flat side of a knife or the back of a spoon until it becomes smooth and spreadable.

Make sure your yeast is active.
– Yeast must be active for dough to rise. You know your yeast is alive and active if it becomes foamy when dissolved in warm milk with a bit of sugar.

– Use warm milk between 100°F (38°C) and 110°F (49°C). If the yeast doesn’t become foamy within 5 to 10 minutes, throw it out and try again.
– Once your yeast has been activated, don’t let it sit too long or else it will be less effective.
3) Some tips about kneading:
Knead until your dough is smooth and elastic.
– Proper kneading is necessary for the dough to bake into the fluffiest, softest, well-shaped rolls.
– This Soft Cinnamon Roll dough is a very soft dough, rich with butter, eggs and sugar. And the addition of the tangzhong will make the dough even more soft and sticky.
- The dough for these cinnamon rolls, when properly kneaded, may still be sticky and soft, but will also be smooth and elastic. If you pull on a bit of dough, it should be able to be stretched until almost translucent without breaking or tearing (the “windowpane” test).

Because this is a very soft and sticky dough, you may be very tempted to add flour, but DON’T add any. A soft, sticky dough is what will become soft, light cinnamon rolls.
If your dough didn’t pass the windowpane test:
– If you have kneaded for the allotted time but your dough is not passing the windowpane test, don’t stress:
- Make sure you are using the paddle attachment.
- Rest your dough for 10 minutes (and up to 30 minutes) then test again. (It’s amazing what a little rest can do for dough’s smoothness and elasticity.)
- If the dough is still not smooth and elastic, knead for 3 minutes and then re-test.
- Repeat, if needed, until the dough passes the windowpane test.
Do not over-knead:
- If you start to feel the dough becoming firm and less stretchy, stop kneading or else you risk over-kneading your dough. Over-kneaded dough will become dry and dense bread with a hard crust.
4) If you’re kneading by hand: (If not, SKIP)
– I think kneading this dough by hand is tricky. It can be very soft, sticky and messy. Especially when kneading in the butter. I really recommend using a mixer. But if you don’t have access to a mixer or choose not to use one, here’s one way to knead your sticky dough: The French Knead (aka Slap and Fold method)
- Mix the shaggy dough with a pastry scraper to ensure there are no dry spots of flour. Cover with plastic wrap and let the dough rest for about 20 to 30 minutes to let the flour absorb some of the moisture.
- After resting, bring the dough together a bit by mixing it with a pastry scraper before scraping it out onto a clean, smooth counter.
- Using fingertips, pick up the top half of the dough, lift the entire mass and then slap the hanging end of the dough onto the counter, letting it stick and anchor itself. In one motion, stretch the dough toward you and then fold it over on itself.
- Next pick up the dough from the left side, lift, slap, stretch and fold. Do it again, picking up the dough from the left. (This will rotate the dough for even kneading.)
- Repeat the process, taking breaks occasionally to clean up the counter with a pastry scraper.
- The dough will be sticky and all over the place at first. That’s OK. Don’t add flour, water or oil in an attempt to conquer the stickiness. Just keep going and the dough will come together eventually.
- Knead until the dough passes the windowpane test. The dough will still be sticky, but should be manageable. It should also be smooth and elastic.
Some tips:
– Pick up the dough with fingertips. The less full-handed contact, the easier it will be.
– Clean off the countertop occasionally with a pastry scraper. The cleaner your surface, the smoother the process will go.
– Be patient. The dough will be everywhere for awhile. Just keep the rhythm going even if everything is sticking together. Eventually the dough will stick more to itself and less to the countertop or your fingers.
Feel free to take breaks.
Bread dough continues to build structure (gluten) even while resting. So feel free to take short breaks while kneading. (Be sure to cover your dough with plastic wrap to prevent it from drying out.)
- It takes me about 20 minutes of continuous kneading to reach a smooth windowpane. (Although I have read that others are able to do it in considerably less time.) But I have also gotten beautiful smooth results with a great windowpane by kneading for 5 minutes and resting the dough for 20 minutes and repeating this 3 or 4 times.
– Here’s one of the great videos that I watched to learn the French Knead method:
Kneading in the butter:
I am sure there are many ways to this. This is the way that works for me:
– Mash/poke about a third of the butter into the dough with your fingertips.
– Pull up the sides of the dough and fold over the butter, pressing firmly into the center with your fingertips or knuckles.
– Continue going round the dough pulling up the sides and folding/pressing into the center until the butter is fully incorporated before adding in the next bit of butter. Use a pastry scrape to bring back any butter oozing out onto the counter.
– After all the butter has been incorporated into the dough, knead for 5 to 8 minutes, until the dough is completely smooth.
- This may take some time and be messy at first. But be patient and continue to knead in the butter until the dough is smooth, homogeneous and glossy.
- Incorporate the butter a bit at a time. This will not only be easier, it will actually take less time to get the job done than trying to knead in all the butter at once.
5) First rise (bulk fermentation):
– This dough will take between 1 or 2 hours to rise at room temperature or at least 8 hours in the refrigerator.
- If you let your dough rise overnight in the refrigerator, you will need to punch it down at least once. After punching down, reshape the dough into a ball by pulling up the sides and folding it into the center. Flip the dough so that the top is smooth and greased.
– I don’t recommend trying to rush it by putting it in a proofing drawer or warm oven. The slow rise is actually more beneficial for the flavor and texture of your cinnamon rolls.
6) Rolling, filling and slicing the dough:
Rolling:
– Lightly dust the counter, the rolling pin and the dough with flour, as needed, to help with any stickiness.


Filling:
– Whipping the filling until light and fluffy will make it easier to spread on the soft dough.
– The easiest way to spread the filling on the soft dough is to first dot the filling evenly around around the dough, then gingerly connect the dots.


– Roll up the dough from top to bottom. Lightly flour your hands if the dough is sticky. Use a pastry scraper to gently nudge the dough if the dough is sticking to the counter.
– Once the dough is rolled up, pat the log gently so that it is even in thickness from end- to-end. This will help keep the rolls uniform in size.


Slicing:
– The easiest way to slice this very soft cinnamon roll dough is with dental floss (unflavored), fishing line or some really strong thread. I find this method gives me the cleanest slices. (Although that won’t matter once they’re baked and frosted.)
- To slice using dental floss, slide a long piece of dental floss under the dough. Criss-cross it around the top. Pull in opposite directions to pull the floss through the roll. Repeat, slicing at even intervals.


– A long, very sharp, lightly oiled unserrated knife can also be used. Use long strokes and clean the knife between slices.
See below: Floss vs. knife: (They both get the job done.)


7) Different size pans:
– If you don’t have a 10×15-inch pan, you can use whatever size pans you have. Just slice the log into the number of pieces needed to fit the pans nicely. These are my suggestions:
- 2 9-inch round springform pans: 9 rolls per pan
- 2 8×8-inch square pans: 9 rolls per pan
- 1 9×13-inch pan: 12 rolls (The rolls are a little squished.)
- 1 18×13-inch half-sheet pan: 12 rolls (The rolls spread out.)

– Cooking times may need to be adjusted. But no matter what size pan you use, the cinnamon rolls are done when they reach an internal temperature of about 190°F (88°C).
8) Second rise (Proofing)
– This dough will take between 1 to 2 hours to be just about double in volume. If your dough was refrigerated, it may take between 2 to 3 hours.
– Be patient and don’t rush it by putting the rolls in a proofing drawer or warm oven. In my experience, this just causes all the butter in the filling to melt and leach out.

– The cinnamon rolls are ready to bake when they are soft and puffed and just about double in size.
9) Be sure to soften your cream cheese and butter for the icing early on.
– It is necessary for the cream cheese and butter to be nice and soft when you’re ready to whip them into smooth and fluffy icing.
– Take your ingredients out of the refrigerator during your dough’s the second rise or earlier.

10) Frost the cinnamon rolls while still very warm.
– Frosting the cinnamon rolls while still warm is crucial to making them nice and soft.
– Make sure to frost the sides and edges, too.

11) When storing, keep the cut and exposed edges moist.
– Regardless of the container you use for your cinnamon rolls or whether you keep them on the counter or in the refrigerator, press some plastic wrap against the cut and exposed edges. This will keep them from drying out and forming a “crust”.

Related Recipes
Japanese Milk Bread

–
Soft and Airy Pandesal (Tangzhong)

Click HERE for other BREADS recipes!
–
–
–
–
–
Ads
Is milk powder the same thing as dry milk? If not, is there anything I can substitute for the milk powder? Would plain milk work?
Hello A. Yes powdered milk is the same as dry milk. Do not use plain milk. If you don’t have any dry / powdered milk, that’s ok. The recipe will still work without it. The powdered milk just adds a bit extra flavor and aroma. Happy baking!
I have tried about 15 recipes for cinnamon rolls, none of which, meet my expectations— until I baked these this morning. OMG — they are plump, soft and delicious. Thank you for the recipe and the detailed instructions. I will replace all my other recipes with this one.
Hi Teresa! Thank you so so much for the comment. It really makes me happy that you enjoyed this recipe. It’s one of my favorites ☺️. Enjoy!
These were so good that my husband and son cleaned up after supper without me asking…lol. Wondering…since patience is not my strong suit…how does the recipe work w/ quick rise yeast?
Hello Brenda! I am so happy you like these! I personally have not found much time saved with these cinnamon rolls using quick rise yeast. But it may be different with you. Just keep an eye on the dough and rely on your visual judgement instead of relying on the clock. Good luck!
Thank you! I wish I could include a picture of how beautiful my rolls turned out.
Hola, la leche es líquida ? O en polvo?
Hello! The milk is powdered – polvo. Happy baking 😊
Just made these this morning and they are fantastic! Definitely a keeper
Thank you for the comment, Autumn! I’m glad you like them!!
Hi there … any adjustments for high altitude? I’m at around 5,500 ft. Thank you!
Hello Camilla,
I wish I could help you here but I’m not familiar with high altitude baking….
Also, I’ve seen so many bakers post about pouring cream over the rolls before baking. Would that add anything here?
Hello again!
I’ve seen that too! I’ve never tried that with these rolls. These rolls are already pretty soft and light, but I may have to try and see. If you try it, I would love to hear how it turned out!